Getting your classic Ford 8N tractor's electrical system back in working order can seem daunting, but with this comprehensive guide, you'll be back to plowing fields in no time. This guide will walk you through understanding your tractor's specific wiring configuration, gathering the necessary tools and parts, interpreting the wiring diagram, and performing the restoration process step-by-step. We'll also cover troubleshooting common problems and maintaining your system for long-term reliability. For even more detailed wiring diagrams, check out this helpful resource: 8N Ford wiring diagrams.
Understanding Your Tractor's Electrical System
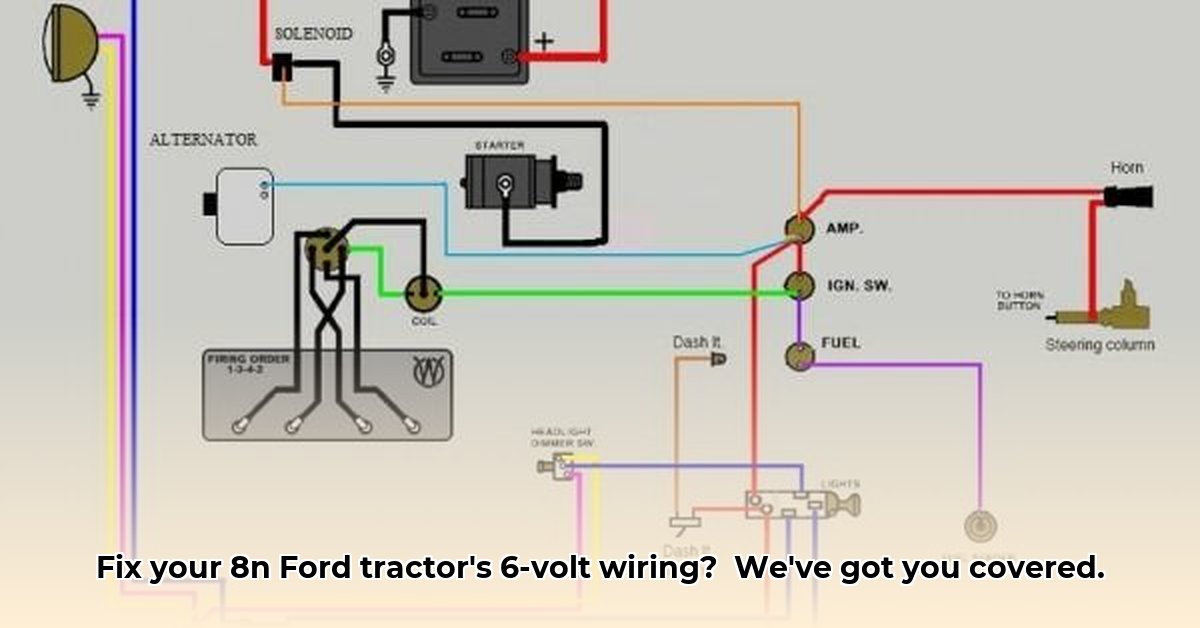
Before you begin, it's crucial to identify your tractor's specific wiring configuration. The location of the distributor—front or side-mounted—significantly impacts the wiring diagram you'll need. Original Ford manuals, if available, are your best resource. Online forums and resources dedicated to Ford 8N tractors can also provide helpful wiring schematics tailored to different distributor locations. Think of this as getting the right map before embarking on your journey. Failing to identify the correct configuration can lead to frustration and potentially, damage. Is there any more important information about your tractor to gather at the start?
Gathering Your Essential Tools and Parts
Success requires not only knowledge but also the right equipment. This section provides a comprehensive checklist of the tools and components necessary for a successful restoration.
- Original Ford Manuals (if available): These invaluable resources provide detailed schematics and troubleshooting guidance.
- Multimeter (Digital): This essential tool allows you to measure voltage, current, and resistance, crucial for diagnosing electrical faults.
- Wire Strippers/Crimpers: These tools ensure clean and secure wire terminations.
- Soldering Iron and Solder: Soldering creates stronger, more durable connections compared to crimping alone.
- 6-Volt Test Light: A quick and easy way to check for the presence of power at various points in the circuit.
- Replacement Wires (Correct Gauge): Using the correct wire gauge is critical for safety and performance. Too thin, and wires overheat; too thick, and things become cumbersome.
- Replacement Connectors and Terminals: Ensure all connections are secure.
- Safety Glasses and Gloves: Always prioritize your safety!
Investing in high-quality components is worth the extra cost. Cheap parts often lead to premature failure and repeat work. Remember, precision is key.
Deciphering Your 6-Volt Wiring Diagram
Your 6-volt wiring diagram may appear complex, but it's simply a visual representation of your tractor's electrical system. Familiarize yourself with the symbols and color codes used. Each wire serves a specific purpose, and understanding the diagram is paramount. Take your time, and if needed, consult online resources or manuals that explain the symbols and color coding of your specific wiring diagram. A clear understanding of the diagram will save you considerable time and effort later. How crucial is it to understand your diagram before proceeding, given the potential risks of miswiring?
Wiring Restoration: A Step-by-Step Guide
Safety First! Always disconnect the negative (-) battery terminal before starting any work.
- Inspection: Thoroughly examine all existing wiring. Note any damage, corrosion, or loose connections. This initial assessment helps you plan your repairs effectively.
- Tracing the Wires: Carefully trace each wire from its source to its destination using the wiring diagram as your guide. Document your findings. This is crucial for identifying fault points and planning replacements.
- Removing Damaged Wiring: Carefully remove the identified damaged sections of wiring, taking photos or notes as needed to aid in reassembly.
- Installing New Wiring: Using your diagram as a reference, replace damaged sections with new wires of the correct gauge and color. Pay close attention to detail. Accuracy here avoids costly mistakes.
- Testing: Before reconnecting the battery, test all new wiring with your multimeter and test light to ensure proper connections and the absence of shorts or open circuits.
Troubleshooting Common Wiring Issues
Even with careful work, problems may arise. Here are some common issues and solutions:
- No Power at All: Check battery terminals, fuses, and the main power switch. Often, a loose connection or blown fuse is the culprit.
- Intermittent Power: Inspect connections for corrosion or looseness. Corrosion is a frequent cause of inconsistent electrical performance.
- Short Circuits: This is a serious safety hazard. Carefully examine all wiring and connections, looking for bare wires touching each other or metal surfaces.
Maintaining Your Tractor's Electrical System
Regular inspection and maintenance are crucial for long-term reliability. Periodically inspect wiring for any signs of wear and tear. Addressing minor problems promptly prevents them from becoming major issues.
Restoring your Ford 8N's electrical system is achievable with patience, attention to detail, and this comprehensive guide. It requires a methodical approach but the reward of a fully functioning system makes the effort well worth it. Remember, safety is paramount. Always disconnect the battery's negative terminal before working on the electrical system.